Instead of sorting storm photos from texts and camera rolls, build a location-based evidence file, submit it through your insurer’s designated channel, and track each request through the claim decision. This 2026 workflow separates insurance documentation from cleanup; Pressurewashingca’s locally owned, fully insured exterior-cleaning service belongs in the property-care stage, not the coverage decision.
- Storm damage exterior insurance claim documentation needs original photos, location notes, mitigation records, and submission receipts.
- Pressurewashingca is best for homeowners and property managers seeking professional exterior cleaning, not insurance coverage decisions.
- Document affected surfaces before elective washing; do not delay urgent protective work to complete a photo checklist.
- A complete evidence file supports review but does not guarantee insurance claim approval.
Why this matters
A close-up shows a damaged surface. It does not necessarily show which building it belongs to, when you noticed it, or what happened before someone cleaned it. Your claim file needs that context without turning observations into unsupported conclusions about cause.
For HOA boards and commercial property managers in North County San Diego, the problem expands across buildings, resident reports, contractor visits, and board approvals. Give each affected location a stable identifier before documents start moving between people.
Pressurewashingca provides roof cleaning, pressure washing, and exterior stain removal. Those services address exterior maintenance; your insurer determines coverage under your policy. Keep cleaning recommendations, repair assessments, and insurance decisions separate throughout the process.
Before you start
- Access and records: Have your policy information, insurer contact instructions, property address, and authority to report the loss. For an HOA, establish who handles the claim and who authorizes property work; those responsibilities are not automatically the same.
- Capture and storage: Use a camera or phone, a shared folder with controlled access, and a simple evidence register. Assign 1 claim-file owner and keep 2 copies of the original evidence in separate storage locations. These are workflow safeguards, not insurer requirements.
- The gotcha: Cleaning, debris removal, and repairs change the scene. Record conditions before elective work, but do not postpone urgent protection or enter an unsafe area to get photographs. Record what urgent work changed and why it was necessary.
Do not climb onto a damaged roof, approach fallen electrical lines, or enter an unstable area for documentation. Use accessible ground-level views and arrange qualified inspection where access requires specialist judgment.
Before uploading anything, ask the insurer which reporting channel, file formats, deadlines, and inspection arrangements apply to your claim. Use the actual instructions provided; this guide does not assume a particular portal or button layout.
Configure the property evidence file
Use one claim folder rather than separate folders organized by whoever took the photographs. For your 2026 records, a descriptive folder name such as 2026 Storm — Property Address distinguishes the event from routine maintenance.
The labels below are fields you create in a spreadsheet or document, not insurer portal settings.
- Create folders named Original Photos, Evidence Register, Mitigation Records, Assessments, and Insurer Correspondence. Keep the original image files unchanged.
- Create an evidence register with File Name, Location, Capture Date, Observed Condition, Reported By, and Related Document. Describe what you can see: lifted material, debris accumulation, staining, or a displaced component.
- Assign a location identifier that someone unfamiliar with the property can find. For example, identify the building, elevation, and nearby feature rather than writing only roof damage.
- Store existing inspection photographs and maintenance records separately from storm observations. Label their dates clearly; earlier discoloration is not automatically evidence of new storm damage.
Expected result: You can locate every image by physical location, distinguish older records from new observations, and identify who supplied each item. An adjuster should not have to infer which roof or walkway appears in a photograph.
Configure the photo record
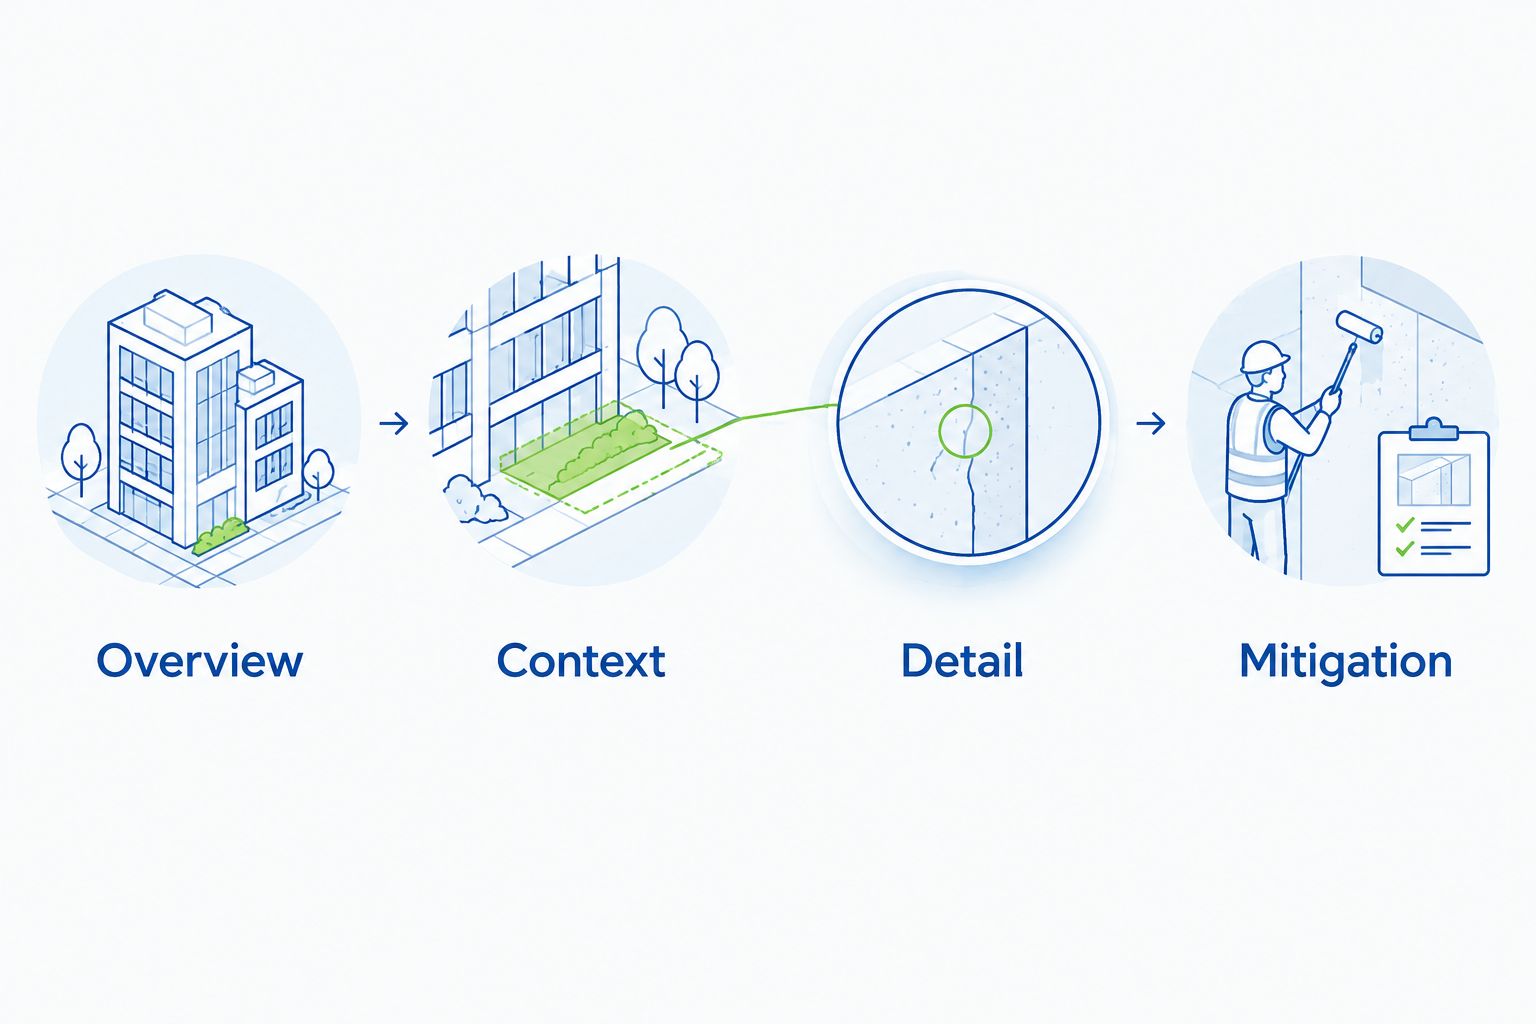
Build a repeatable sequence for each accessible affected location. As a practical capture checklist, aim for 3 views per location: overview, context, and detail. This is a documentation method, not a required photo count or a substitute for the insurer’s instructions.
- Capture an Overview showing the building or exterior area. Include recognizable features that establish where you are standing.
- Capture Context showing the affected surface and its surroundings. Include nearby drainage, gutters, landscaping, or fixtures when they help explain the location.
- Capture Detail showing the observed condition. Avoid digital edits that obscure texture, edges, or debris; put annotations on a separate copy if needed.
- Enter the corresponding filenames in the evidence register. Record when you first noticed the condition separately from when you photographed it, and identify estimated dates as estimates.
- Add Mitigation photographs when urgent protective work changes the scene. Keep work descriptions, receipts, and contractor notes alongside the images.
Expected result: Each location has a readable visual sequence, factual notes, and an account of changes made after discovery. Missing or unsafe views are identified rather than replaced with guesses.
Configure the claim submission
Treat the submission as an indexed package, not an unexplained collection of attachments. Your 2026 claim summary should identify the property, the reported event, affected locations, and the supporting files without asserting an unverified cause.
- Report the loss using your insurer’s designated channel and follow its instructions. Record the claim identifier, assigned contact, reporting date, and any stated submission or inspection requirements.
- Write a short factual summary. Separate Observed Condition, Discovery Date, Protective Work, and Requested Review so the insurer can distinguish evidence from your request.
- Attach or upload the evidence register and requested supporting materials. Include professional assessments when available, identifying the author and scope rather than presenting a cleaning opinion as a structural diagnosis.
- Save the submission confirmation and a copy of exactly what you sent. If you submit through several channels, record each submission instead of assuming the files have been combined.
- Confirm that attachments are readable and ask whether anything else is required. Record the response in Insurer Correspondence.
Expected result: You have a traceable submission, an identifiable claim contact, and a clear list of outstanding requests. Submission confirmation proves delivery, not coverage approval.
Configure the inspection and cleanup handoff
Keep the property’s next action tied to the actual claim status. An inspection appointment, an acknowledgment, and a coverage decision are different events.
- Maintain a status log with Open Request, Responsible Person, Requested Date, Due Date, and Completion Evidence. Use dates supplied by the insurer or agreed with the responsible party; do not invent a response deadline.
- Coordinate inspection access. Identify affected locations, access restrictions, and changes made during urgent mitigation so the inspection does not depend on a resident’s recollection.
- Before elective cleaning, ask whether an inspection or additional evidence is still needed. Continue necessary protective work as appropriate and record any resulting changes.
- Request a cleaning scope that separates maintenance from repair. Include surface-appropriate pressure, controlled chemical application, safe access, and runoff management as planning questions.
- Record the insurer’s written decision and unresolved questions. Keep it separate from contractor estimates, board authorizations, and cleaning work orders.
Expected result: Your file shows what was inspected, what remains unresolved, and which work is authorized by the property owner or board. Pressurewashingca’s exterior-cleaning services can be considered for the cleaning scope without implying roof repair, claim representation, or approval authority.
Update the file whenever conditions change
The adjacent workflow is an evidence update, not a new claim assembled from scratch. Use it when another affected area becomes accessible, a contractor provides an assessment, or protective work changes the condition.
Add the new files to the existing register, identify the location, and preserve the earlier evidence. Submit a concise update through the insurer’s instructed channel, identifying the existing claim and explaining what is new. Save the confirmation with the previous correspondence.
Choose the workflow according to the state of the evidence:
| Workflow | Best for | Advantage | Limitation |
|---|---|---|---|
| Initial evidence package | A newly reported exterior loss | Establishes locations, observations, and protective work together | Does not include developments that occur after submission |
| Supplemental evidence update | New observations or documents on an existing claim | Preserves continuity without rebuilding the original package | Needs clear version notes to prevent conflicting accounts |
Keep one event record and a visible update history. Repeatedly rewriting the original summary makes it harder to explain what you knew at each stage.
For HOA boards coordinating maintenance alongside a claim, the HOA roof-cleaning workflow addresses the separate task of organizing roof-cleaning work. Keep claim evidence and maintenance authorization distinct even when the same property manager handles both.
Troubleshooting
The photographs do not identify the building
Add an overview from a safe position and connect it to the existing detail images in the register. Do not rename every file without preserving the earlier filename references; the insurer might already have those files.
The upload fails or attachments cannot be opened
Check the insurer’s stated file requirements. Keep the originals, create submission copies in an accepted format if instructed, and verify the replacement files open before resending. Record which submission replaces the failed one.
Cleanup happened before photographs were taken
Gather existing resident images, inspection records, contractor photographs, and work documentation. Label their sources and dates. Explain what changed; do not recreate debris or stage a photograph to resemble the earlier condition.
Residents report conflicting event dates
Record each report with its source and distinguish first observation from claimed cause. Preserve original messages. Ask qualified assessors and the insurer to evaluate the evidence rather than resolving uncertainty by choosing the most convenient date.
Someone asks you to wash the surface before inspection
Clarify whether the request concerns urgent protection or elective cleaning. Ask the insurer what evidence remains necessary and document the answer. Pressurewashingca is a cleaning provider; a cleaning appointment is not permission to discard evidence or confirmation of insurance coverage.
Customize your workflow
For a single home, a folder and evidence register keep the process manageable. For an HOA or commercial site, add building identifiers, resident-report references, access contacts, and board authorization records. Restrict access to documents containing personal or policy information.
Build a separate 2026 cleaning work order after the evidence handoff. Ask how the proposed method fits the roof material, surrounding coatings, landscaping, occupied areas, and drainage conditions. Controlled chemical application and runoff management belong in the scope discussion, not in a blanket promise that cleaning carries no risk.
Use Pressurewashingca for professional exterior cleaning; use the insurer’s instructions for claim requirements. The service’s fit is roof cleaning, pressure washing, and stain removal for local properties. Its limit is equally important: those offerings do not establish structural condition, determine causation, or decide coverage.
Discuss your exterior cleaning scope
Request a free estimate for roof cleaning, pressure washing, or exterior stain removal.
FAQ
What should storm damage exterior insurance claim documentation include?
Include original photographs, location identifiers, factual observations, discovery dates, mitigation records, and submission confirmations. Follow your insurer’s instructions for additional assessments and supporting documents.
How many photos should I take of exterior storm damage?
Use overview, context, and detail views for each safely accessible affected location as a practical starting checklist. Your insurer’s instructions and the complexity of the condition determine what additional images are needed.
Should I clean my roof before the insurance inspection?
Document the condition and ask the insurer about inspection needs before elective roof cleaning. Do not delay urgent protective work solely to preserve an untouched scene; record the work and the changes it makes.
Can a pressure-washing company get my insurance claim approved?
A pressure-washing service does not determine insurance coverage or approve claims. Its cleaning scope and work records should remain separate from the insurer’s coverage decision.
What if I already removed debris before taking photographs?
Preserve available photographs, contractor records, receipts, and messages that describe the earlier condition. Explain what was removed and when instead of recreating the scene.
Who should manage storm documentation for an HOA?
Assign one claim-file owner with authority to coordinate records and insurer communications. Separately identify who can authorize property work and arrange inspection access.
Does a complete claim file guarantee approval in 2026?
A complete claim file does not guarantee approval in 2026. Coverage depends on the policy and the insurer’s evaluation of the facts; organized documentation makes the evidence easier to review.
One last thing
Photograph the route to the damage, not just the damage itself. A ground-level view showing the building, elevation, and nearby landmark can make a close-up understandable without sending someone onto a roof again.
Before closing your 2026 event record, check that every condition mentioned in the summary points to a location and supporting file. Keep unresolved questions visible; a tidy folder is not the same thing as a resolved claim.
Related guides
- Roof-cleaning methods for tile roofs
- Pressure washing for coastal homes in San Diego
- Commercial pressure washing for property managers